SPF: what it is, how it works and how to create the record
The list that says which servers can send emails with your domain
SPF (Sender Policy Framework) is a DNS record that specifies which servers can send emails on behalf of your domain. When an email arrives, the receiving server checks that list. If the sender isn’t on it, the server gets suspicious.
Think of a party’s guest list. Whoever is on it gets in; whoever isn’t stays at the door or is let in with caution.
Without that list, anyone could send emails pretending to be your company.
What is SPF?
It is an email authentication standard defined in RFC 7208 (2014). It is published as a TXT record in your domain’s DNS and always starts with v=spf1.
Its goal is to stop sender spoofing. It is one of the three pillars of email authentication, along with DKIM and DMARC.
How does SPF work?
The check takes seconds, every time a server receives an email.
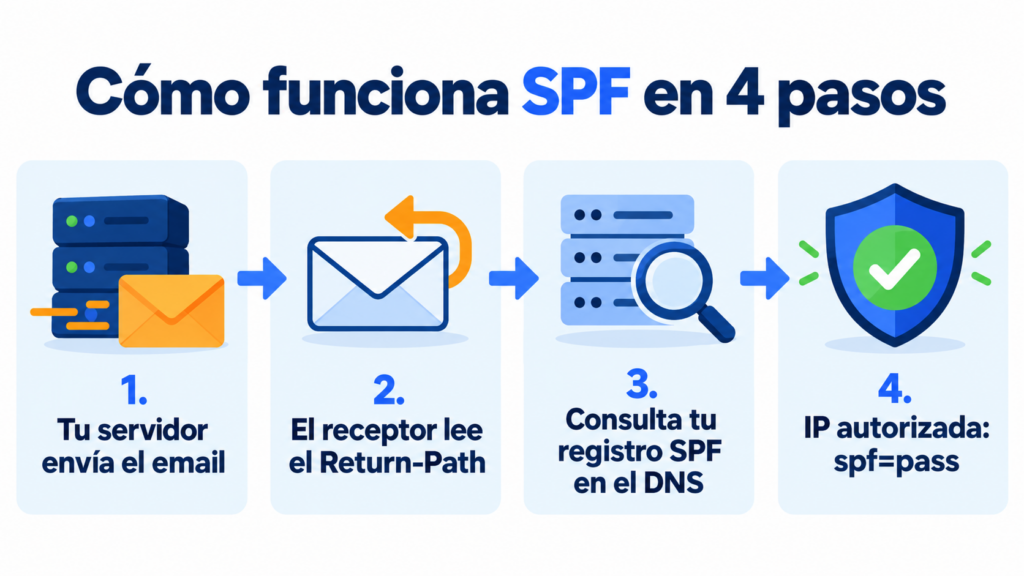
1. Your server sends the email
The message leaves from a specific IP: that of your mail server or that of your email marketing platform.
2. The receiver looks at the technical sender’s domain
It reads the domain of the return address (Return-Path), the one that receives bounces. It isn’t always the same one the recipient sees in the “From” field.
3. It checks the record in your DNS
It looks for the TXT record starting with v=spf1 on that domain and gets the list of authorized servers.
4. It compares the IP and decides
If the IP is on the list, the result is spf=pass. If it isn’t, the result depends on how your record ends: fail, softfail or neutral.
What an SPF record looks like
A typical example:
v=spf1 a mx include:spf.ipzmarketing.com -all
Each part has a meaning:
| Part | What it indicates | Example |
|---|---|---|
| v=spf1 | Version (required, always at the start) | v=spf1 |
| a | Authorizes the domain’s IP | a |
| mx | Authorizes the domain’s mail servers | mx |
| ip4 / ip6 | Authorizes a specific IP or range | ip4:192.0.2.10 |
| include | Authorizes another provider’s servers | include:provider-domain.com |
| all | What to do with everything else (always at the end) | -all |
What -all, ~all and ?all mean
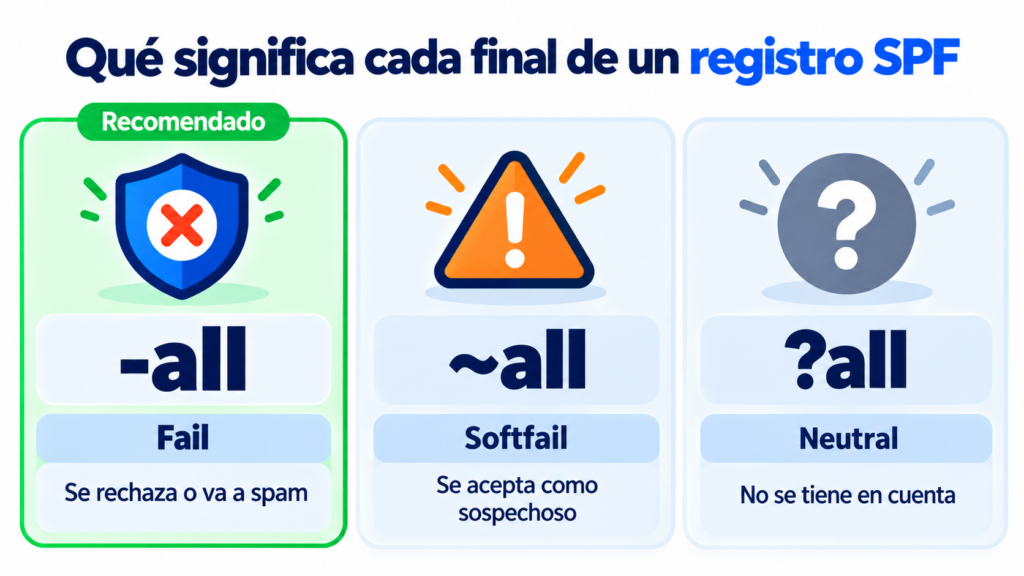
The end of the record tells the receiver what to do with servers that aren’t on your list:
| Ending | Result | What the receiver usually does |
|---|---|---|
| -all | Fail | Reject the email or send it to spam |
| ~all | Softfail (soft failure) | Accept it, but flag it as suspicious |
| ?all | Neutral | Ignore the result |
If all your sending services are already on the list, use -all. If you’re not sure, start with ~all and review your sends before tightening it. Avoid +all: it authorizes any server in the world.
Why is this so important?
Because the major providers already require it. Since February 2024, Gmail and Yahoo require SPF or DKIM from all senders, and all three protocols from anyone sending more than 5,000 emails a day. Microsoft has applied similar requirements in Outlook since May 2025.
It also protects your domain from phishing and improves your deliverability. A domain without this record is easier to spoof and inspires less trust.
That said, it has two limitations. It checks the Return-Path, not the visible “From”, and it fails when another server forwards the email. That’s why it’s combined with DKIM and DMARC.
Authenticate your domain and reach the inbox
Set up SPF, DKIM and DMARC in Mailrelay and send up to 80,000 emails a month for free to 20,000 contacts.
How to create an SPF record step by step
All you need is access to your domain’s DNS panel and the list of services that send on your behalf.
1. List who sends with your domain
Include your business email, your email marketing platform, your CRM, your online store or your invoicing tool.
2. Gather each provider’s include
Each service gives you theirs in its help docs. You’ll find Mailrelay’s at the end of this page.
3. Create or edit the TXT record in your DNS
Write a single record with all of them and end it with -all or ~all. If you already have one, add the new include; don’t create another one.
4. Check that it works
Send yourself an email to Gmail and open “Show original”. You should see SPF: PASS. You can also use tools like MXToolbox.
Common mistakes when setting it up
The most common one is having two records of this type on the same domain. Receivers treat this as an error and the check fails.
Other common mistakes:
- exceeding the limit of 10 DNS lookups (every include, a or mx counts);
- forgetting a service that sends on your behalf, such as your CRM;
- using +all, which authorizes anyone;
- putting all in the middle of the record instead of at the end.
How to set up SPF in Mailrelay
In Mailrelay, all you need to do is add include:spf.ipzmarketing.com to your record. If you don’t have one yet, use the example in the “What an SPF record looks like” section.
Then set up DKIM and DMARC as well, and check that everything is correct in Settings → Email authentication. You’ll find all three records together in the sending domain guide.
If you have questions, support helps you by chat, ticket or phone on every plan, including the free account.
Send authenticated campaigns with your domain
Add the record in minutes and, if you get stuck, support will help you by chat, ticket or phone.
Frequently asked questions about SPF
These are the most common questions about this record.
What does SPF stand for?
Sender Policy Framework. It’s the list of servers authorized to send email with your domain.
What’s the difference between -all and ~all?
With -all, emails from unauthorized servers fail and are usually rejected. With ~all, they soft fail and are usually accepted but flagged as suspicious.
Can I have two SPF records?
No. There can only be one per domain. If you use several providers, add all their includes to the same record.
What happens if I exceed 10 DNS lookups?
The receiver returns a permanent error (permerror) and the email fails the check. Remove the includes you don’t use or replace some of them with their IPs.
How do I know if my domain has SPF?
Send yourself an email to Gmail and open “Show original”. If SPF: PASS appears, it’s set up correctly. You can also check your domain’s TXT record with MXToolbox.