
In this post, we’ll go through Mailrelay’s features point by point so you can discover everything our tool can do for your email marketing.
If you’re already a user, this post will help you get the most out of Mailrelay and make sure you don’t miss any available feature that could help you increase your sales.
And if you’re not a user yet and you’re comparing email marketing tools, you’ll also find answers in this post.
Let’s get started.
1 :· The largest free account offered by an email marketing tool
It’s impossible to talk about Mailrelay without mentioning the limits of the free account, so let’s start there.
As soon as you create a free Mailrelay account, the usage limits are:
- Sending up to 80,000 emails per month
- Uploading and managing up to 20,000 contacts
Free of charge.
Can you have a more profitable sales tool than one that costs you nothing?
This free email sending capacity is one of Mailrelay’s best-known features.
Let’s move on to the next ones.

2 :· Wizard / Step-by-step guide for your first mailing
If you have no experience using email marketing tools, don’t worry.
After creating your Mailrelay account, you’ll see a step-by-step guide that helps you send your first mailing.
There are just three simple steps:
- Import subscribers
- Create a newsletter
- And finally, send the newsletter
Very easy.
Apart from that, everyday use is very simple.

3 :· Easy-to-use control panel
All the tool’s options are available in the top menu, organized by use so they’re easy to find.
This menu is responsive, so you can also navigate the tool on mobile devices, tablets, etc.
The most commonly used menus are:
- Subscribers: to import and manage subscribers and segment them. And also to create signup forms and custom fields.
- Newsletters: this is where we can create newsletters, both regular and RSS. A/B tests. This is also where you can create more senders for your mailings.
- Reports: in this menu we can see the statistics for our mailings, automations and SMTP sends. Importantly, this is also where we can see the usage statistics for our package.
Here we’ve had a quick look at another of Mailrelay’s features

4 :· Contact segmentation
The latest version of Mailrelay offers a large number of parameters for segmenting your contact list:
- Subscriber values, such as name, import date, groups or lists, language, etc.
- Subscriber actions, such as which newsletters they opened, which ones they clicked on, etc.
- Custom field values, with whatever data we want and have imported
With all this segmentation, we can divide our contact list in two main ways:
► Groups and dynamic segments
The key difference here is that groups are static, that is, made up of the contacts we added at the time (although we can add or remove contacts later). Dynamic segments, on the other hand, are just that: dynamic. They will only contain the members who meet the condition we’re interested in.
In other words, if we have a segment of contacts who live in “Spain” and we update a contact so that they live in “France”, they’ll automatically leave that segment without us having to do anything.
This feature is related to the possibility of creating

5 :· Custom fields for email campaigns
Besides creating the custom fields we need and filtering by them, as we saw earlier, we can add columns with those custom fields to the subscriber list.
This way, you can quickly see the data you’re interested in right in the list.
You can even export it if you need to work with it locally on your computer.
A detail worth highlighting: when we create custom fields, we can make them required:

This is reflected in the signup forms:
6 :· Custom contact signup forms
It’s very easy to create signup forms with Mailrelay, and there are also some interesting features. Let’s take a look:

To begin with, you can create signup forms that include both system fields (email, name, address, country) and fields we’ve created ourselves because they’re useful to us.
You can also include a captcha:

This way, you keep fake email signups and bot registrations to a minimum.
You can also add a field to accept the privacy policy:

This way, the form shows the information about the privacy policy, and users must accept it to sign up.
Besides allowing new signups through the signup form, we can import contacts
► Embedding the forms
These forms generate compact HTML code that’s very easy to copy and paste into any website.
And if you want, you can also generate code that shows the form in a popup after a few seconds, when a button is clicked, or when the user is about to leave the page.
This makes it easier for contacts to subscribe.
► Sender linked to the form
Each form we create can have a different sender linked to it, so when contacts subscribe, they’ll receive the confirmation email from the sender you choose.
Since the sender is linked at form level rather than account level, you have more freedom to manage your signup processes.

7 :· Importing contact lists
There are several options for importing contacts:
- Copy and paste contacts directly into a text box
- Import a .csv file
- Or import directly from Mailchimp

You can use whichever method is most convenient for you to import your contacts, with just their email or with any details you need.
On top of that, you can manage a blacklist, that is, a list of emails that should never be sent anything:

► Mailrelay handles unsubscribes through links automatically
But if, when you migrate to Mailrelay, you have contacts you know should never be sent anything, you can add them to the blacklist.
Now let’s look at one of Mailrelay’s most interesting features: the newsletter editor.

It’s a very simple editor: you just drag the elements you want into the editing area, where you can modify them.
You can also reorder, delete, duplicate them, etc.
Very easy, as you can see in the image below:

You can also watch the following video, which shows how to use the editor to put together a newsletter in just a few minutes:
You have several blocks available:
- Text
- Image
- Video
- Buttons
- Dividers
- Social media
Besides the drag & drop editor, you can also use an HTML editor, where you can edit your newsletters’ code exactly as you want.
Or import from external files, if you already have a ready-made template.
Many web applications and systems can generate RSS feeds; WordPress, for example, is one of them.
An RSS feed is nothing more than a link that lists the posts on our blog
What can we use it for?
To automate sending newsletters.
With Mailrelay, you can set up automation so that whenever there’s a new post in that feed, a newsletter is sent to your contacts.
Here’s an example:

When the mailing is sent, this code is automatically replaced with the feed’s content.
10 :· A/B tests for mailings
Another tool for our newsletters: A/B tests help you find out which subjects or senders work best for your newsletters.
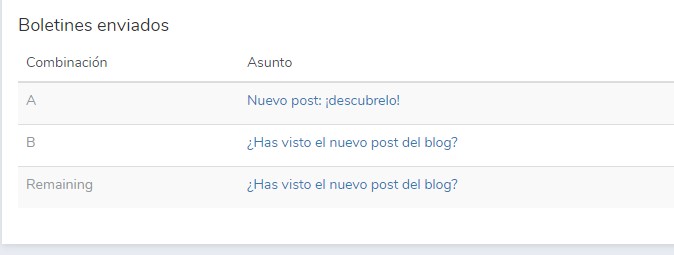
If you have an important mailing to send, it’s best to test several subjects, for example, to make sure the one sent to most of your contacts is the most effective.
And speaking of senders
11 :· Sender management
In your Mailrelay account, you can add all the senders you need, both from the domain you created the account with and from other domains.
This way, you can use whichever senders you need in your email sends.

12 :· Mailing statistics
Full reports are available for every mailing sent from Mailrelay:

From that list, we can pick a specific mailing and see all the detailed information:

Here you can see there are more menus where you’ll find more information:
- Emails sent
- Views
- Clicks
- Unsubscribes
- Forwards
- Etc.
In these options, you’ll find much more information about the contacts who performed the various actions. You can also export this data.
We’ll also have access to the click map, an option that lets us see visually how many clicks each link in the newsletter received.
You can find more information about statistics in this post.
► SMTP sending and automation (autoresponder) reports
Just as we have information about the mailings sent from the tool, you also have statistics for emails sent via SMTP and for any automations/autoresponders you’ve set up.
For autoresponders, you’ll be able to see cumulative statistics, which will let you analyze the effectiveness and evolution over time of the autoresponders you’ve created.
You can also compare the statistics of several newsletters to find out which topics or subjects work best for you:

Lastly, a feature related to statistics and to the usage of your Mailrelay account
► Package statistics
If you want to know in detail how many emails you’ve sent and how many you can still send, this is the menu where you’ll find out:

It quickly gives you information about your package usage and the volume of emails you can still send. If you click on “view detailed package usage”, you’ll see full usage information, with the newsletters sent, automations, the cost of each mailing, etc.

13 :· Autoresponders and automations
This is another Mailrelay feature you should know about.
To begin with, you can choose between two types of automations:

The birthday one does exactly what you’d expect: it sends a newsletter on the birthday of the person in question.
And the “custom” one lets you add countless more triggers:

There are many options, both for subscriber activity and for actions taken with the newsletter; ideally, you should get to know all the options by reading this post.
That way, you’ll see how much you can get out of this Mailrelay feature.
► Some of these automations
Such as the unsubscribe one, can be connected to webhooks so that the unsubscribe can be synced with external software, a CRM, etc.

14 :· Settings and other advanced Mailrelay features
Let’s look at a few more utilities and some slightly more advanced but useful features.
The first is one you’ll definitely use
► Email authentication
This menu will help you check whether you’ve correctly set up your SPF and DKIM settings, which are essential to keep your mailings free of deliverability problems.

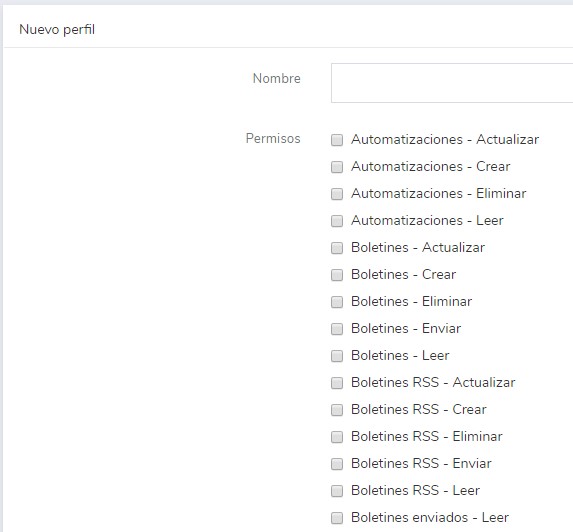
► User profiles
This feature lets you create different user profiles, so each user has different access rights.
Imagine you want a user to have access only to editing newsletters, without seeing the contacts.
You can create a user with those permissions.
► SMTP server
Many companies that already have in-house sending systems, CRMs, or that send through desktop tools prefer to send mailings through an SMTP server.
This setup is very simple, immediate and transparent for the company’s sending system.
All you need to do is replace the details of the SMTP server the company is currently using with Mailrelay’s, and then keep sending.

In the new version of Mailrelay, these SMTP sends can have statistics just like mailings sent from the control panel itself.
► Development API for email marketing
All Mailrelay accounts include access to a development API:
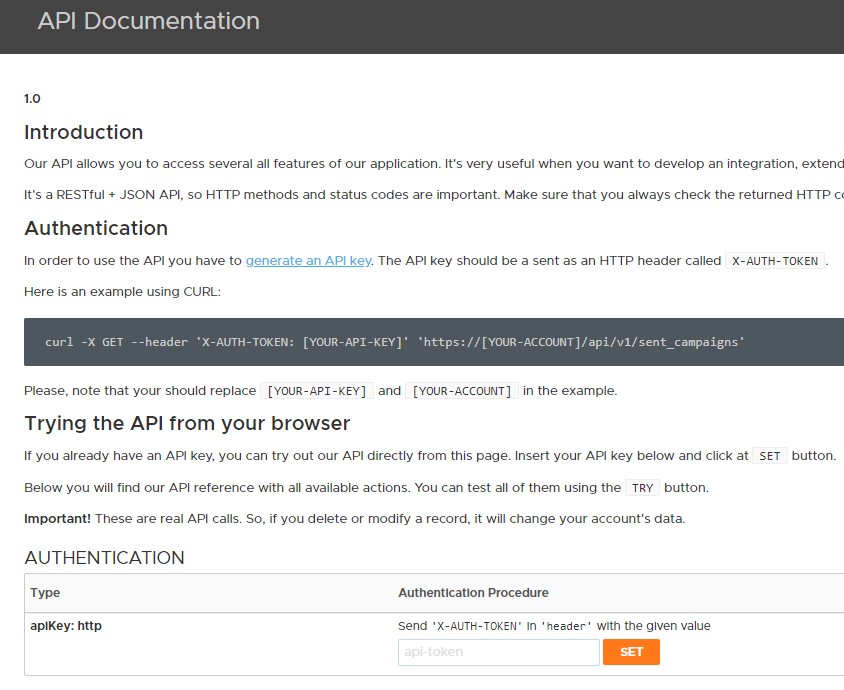
This development API has examples in different programming languages, such as PHP, Ruby, Python, etc.
And not only are there examples: many functions can be tested directly from the documentation page, so it’s much easier to see how things are done.
With the documentation, the examples and the ability to test directly from the documentation page, it’s much easier to build integrations with the Mailrelay API.
► Included IPs
All plans from 1,000,000 emails upwards include the IPs needed for improved deliverability of your mailing campaigns.
You can take a look at the plans that include IPs here.
:· There’s much more
Yes, Mailrelay has many more small features that make managing your email marketing campaigns very easy.
And new features are being added little by little, so the best thing to do is create an account and try Mailrelay.
There are no risks and you have nothing to lose; it’s all benefits.

Jose Argudo
CMO at Mailrelay. Writes about email marketing, copywriting, and conversion for small businesses and entrepreneurs.