
In this first tutorial about the new Mailrelay version 3, we’ll look at the first steps you need to take to send a newsletter.
In other posts, we’ll look at specific features and the new and advanced features available on this version.
As always, don’t worry, you can count on our support team to answer any questions you may have.
If you’ve never used Mailrelay, or if you come from the previous version, this is the best place to learn how to use this new version.
Oh, I haven’t forgotten!
There is something that never changed
► We continue to offer you the free account with which you can send up to 80,000 emails per month for up to 20,000 subscribers.
However, you can now do this with an updated tool and with new features that will help you improve the performance of your email marketing campaigns.
Let’s start?
· The main panel
Let’s have a look, pay attention to the following image:
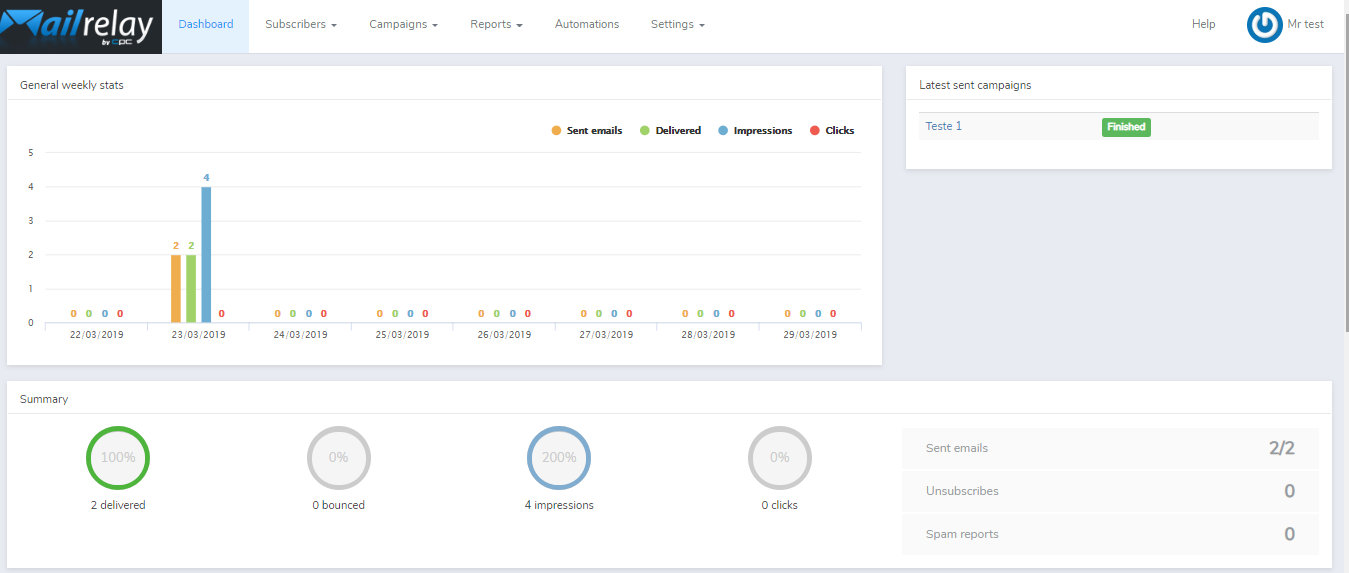
This is an overview of the new dashboard, with all the options that will allow you to manage your account, with a brief summary of your latest campaigns. You will see the most recent campaigns, the number of emails, open rates, clicks, and more.
You can even see information about which subscribers have interacted recently and their location.
You can find the main menu at the top. This menu is more accessible because you don’t have to keep scrolling down all the time.
Let’s see the available options:

From left to right:
- Dashboard> allows you to return to this screen
- Subscribers> list of all your subscribers, management of groups and segments, import subscribers, create opt-in forms, custom fields
- Campaigns > creating and managing campaigns, RSS campaigns, and A/B testing. Here you will also find the option for managing senders.
- Reports> where you can see the statistics of your campaigns, automation, and package
- Automation> automation management
- Setting > menu with several options to manage various aspects of your account
We tried to group the menus as coherently as possible.
If you were using the previous version of Mailrelay, it might take a while for you to get used to the new layout, but soon you will see that it is much more friendly than the previous email marketing software.
Let’s move on.
As this is a practical tutorial, we will see the options one by one so that you can send a campaign using our new email marketing software.
The next step would be to import our subscribers.

· Importing contacts, subscriber list
The first thing we have to do is create the “location” where we are going to “import” our contacts.
This is very important to organize your email lists.
Here, we have two different options:
- Groups> the same function as always. If you import your subscribers to a group when you create a campaign you can select it. When you send your email, the message will be sent to all subscribers registered in this group.
- Segments> are different because the contacts must meet a condition. Segments are dynamic, so the number of subscribers varies.
As the purpose of this tutorial is to see the most basic aspects so that you can start working and sending emails; we are going to create a group.
Now, we will click on the menu subscribers -> Groups.
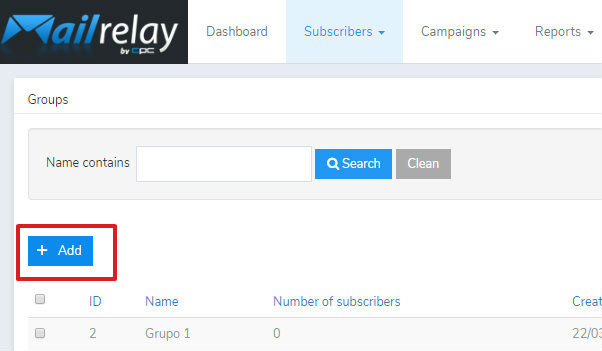
In this screen, we have to click the add button, to create a new group.
Creating a group is very simple; you only need to fill two values:
- Name
- Description
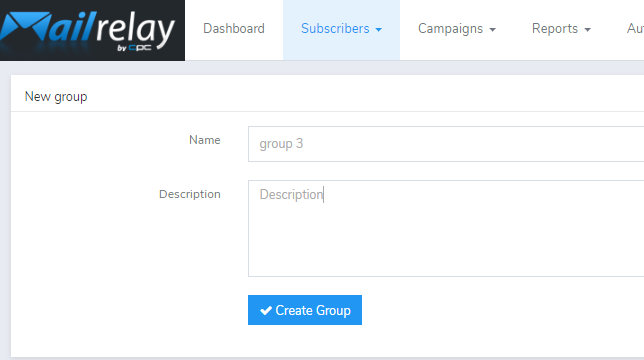
You only need to name the group and click on “Create group.“
The description is just an internal value, so we can organize our list of emails.
Important
You should not paste the emails into the description box. Use this field only for identifying the group if you have several databases and want to create more than one group.
After clicking create a group, we will see this screen:
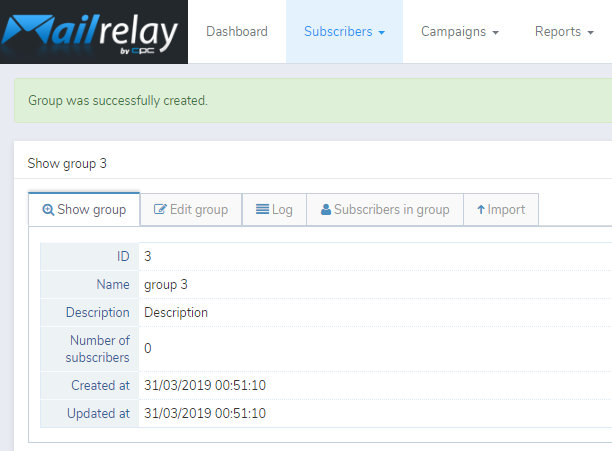
It is a short summary of the configured values, but it includes a shortcut, which we can use if we want to import contacts quickly (email only), we can click on this button, which will take us to a screen where we can paste our contacts.
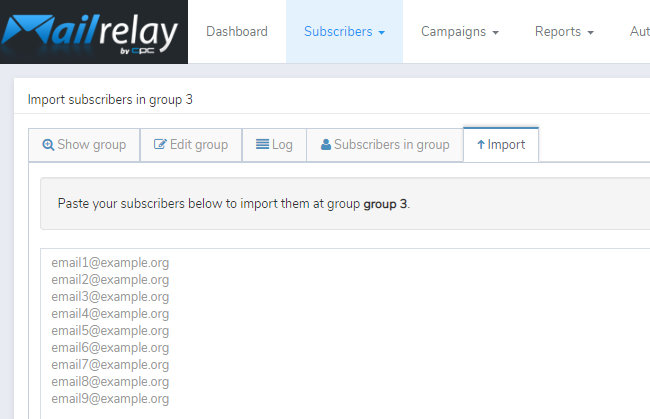
It’s a quick option if we just want to include the email from our contacts, without names or other fields.
We will not use this option in this tutorial since we want to import a list of emails with other fields.
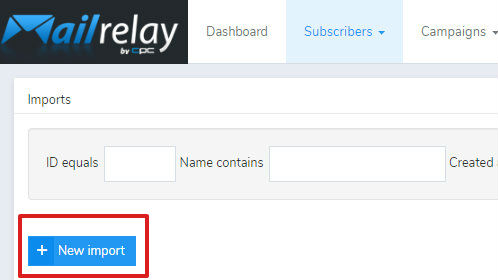
► Subscribers -> Imports
Now let’s import a new mailing list by clicking on the New import:
On the next screen, we’ll look at the available import options. For this article, we will use the option to import a CSV, or text file because I consider it to be more usual as it will allow you to import a mailing list with more fields and send personalized campaigns.
Let’s see the options:
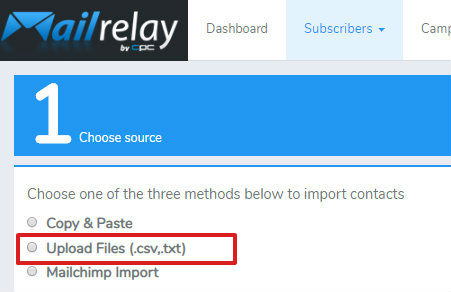
- Copy and paste> this option is the same as we saw before and we will not use it for this tutorial, although it may be a useful option for When you only have to past a few contacts.
- Import files> import from a TXT or CSV file, this is the option we will use today.
- Import from Mailchimp> This option is very clear.
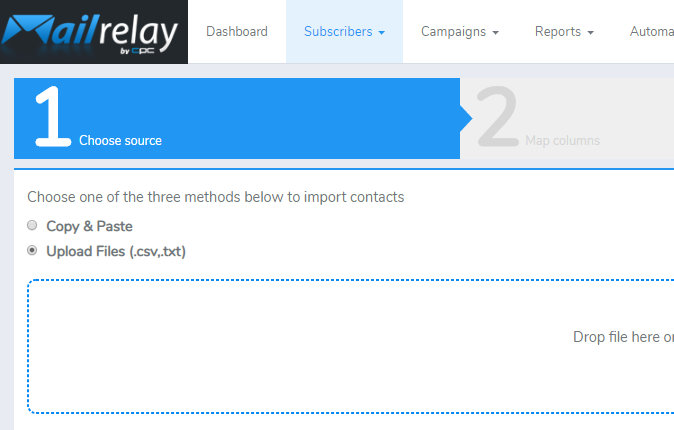
When you check the option, the system will display a box that you can use to drag the file that you want to import:
► File format
You can import a CSV or TXT file “it must also be separated by commas”. In this case, we’ll use a TXT file which will be in this format:

As you can see, we have:
- a row for each contact
- Name
- Separated by a comma
We could import more values, using the same principle of separating them by commas, for example: name,email,city,address
It doesn’t really matter how many fields there are, as long as they have been correctly formatted, with one contact per line separated by commas.
Well, after reviewing the file, it’s time to import it. You can do this using the “drag the file here” option.
You can also click to search for it on your computer.
► Import values
Once the file is uploaded, we will see a screen similar to this one:
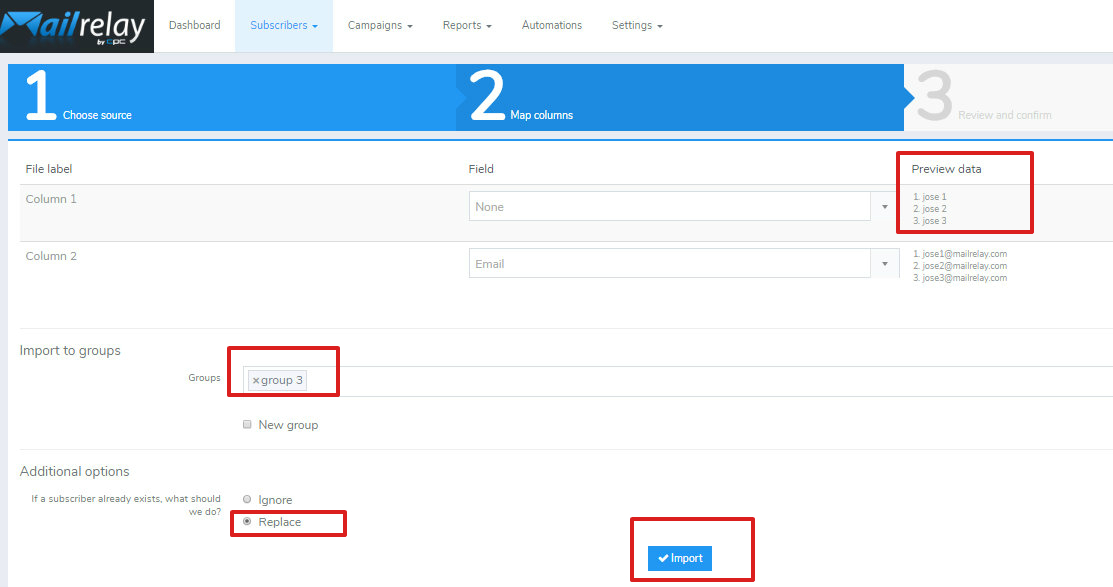
Don’t worry about seeing so many options; it will be very easy to configure this screen. You will be sending your campaign in a few more minutes.
Let’s see the main points:
- Field and columns. We will have to match the fields with the columns of the file. For this, we will use the drop-down. Please note that we can preview the data to confirm that the columns will be imported into the right fields. In this case, we need to select the column name and match it to the field name and pair the email field with the emails column.
- Import to groups. Here we choose the group for which we want to import the contacts, just click and select it (note that there is also an option for creating the group right now)
- Additional options. Finally we can choose what to do with existing subscribers. We can ignore them (if you check this option the existing emails will not be imported) or we can check to overwrite these emails.
Now you just need to click on Import, and the system will start saving you subscribers in your account.
“Update existing subscriber data”: if we don’t check this option and import existing contacts that we’ve already imported, the import won’t do anything with them. They will be ignored and remain as they are. If you check this option, two more options will appear.
Keep subscribers in their current groups and add them to the newly selected groups. That’s exactly what it says. If we already have these contacts imported into other groups, they will remain in those groups and will also be added to the new group. Don’t worry, Mailrelay doesn’t consider these contacts as duplicated. What happens is that they will be in two lists.
Remove subscribers from current groups and add them to the new groups selected. Basically what this option does is “move” the contacts from where they are now, to the new group.
Now just click on “import” and the import will be complete.
Important
In the field drop-down menus, you’ll see that there are “built-in” fields, which are fields that exist by default in the system, such as name, address, city etc. You don’t need to create them, just import the data into them.
When the process is complete, you’ll see a short summary, something like this:
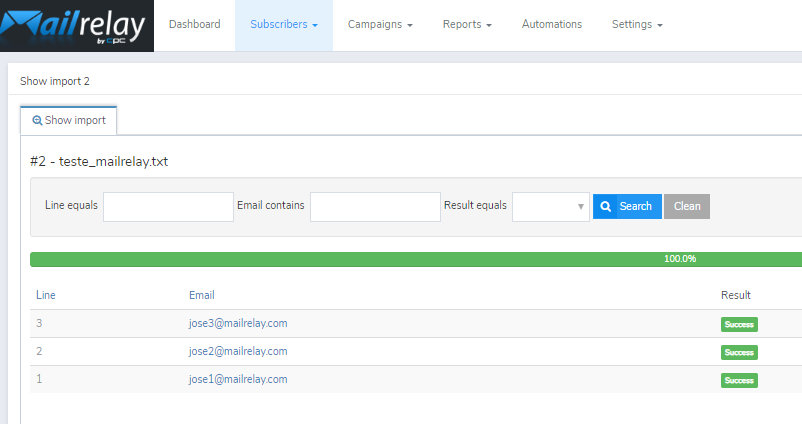
With the list of emails imported, and the result, with information about the status of each line in the database.
We have already imported our contacts.
► How can we see the imported contacts?
Very easy, we will go to the menu Subscribers – subscribers:
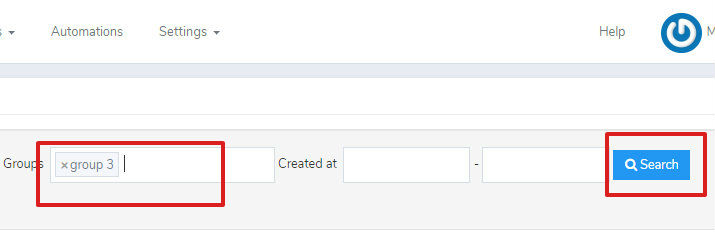
We will do two things:
- In the group box, we have to select the group that we want to see
- And then we will click on search
So, on the list, we will only see the subscribers that belong to this group.
The import process is very simple; if you follow these steps, your list will be imported to your account.
Let’s go to the next step?

· How to create a campaign with the Mailrelay drag & drop editor
This Mailrelay version includes several options for creating your campaigns, we can see them in the Campaigns -> Campaigns menu.
Here, if you click the Add button as in the previous menus, you’ll see a screen like this one:
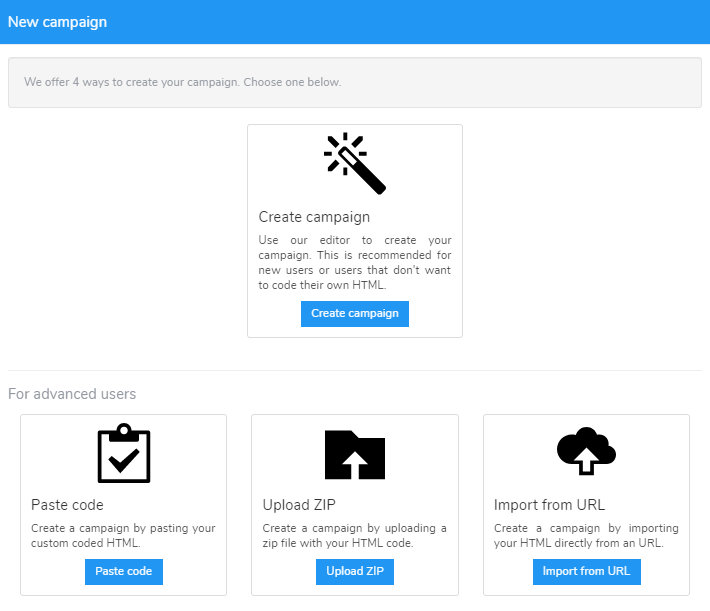
Here you can find four options for editing campaigns:
- Create a campaign. With this option, we will use the drag & drop editor to create our campaign easily and quickly
- Paste code. If we have a campaign created in HTML, we can import it using a classic editor
- Import zip file. It works the same way as the previous option, but you will be importing directly from your computer
- Import from a URL. Another similar function, this time to import a campaign from a URL. Important: web pages are often created using CSS, external Javascript, menus, etc. which means they will not be imported correctly, or will not be sent as well as an email. Don’t import a website URL when creating a campaign.
Important
The drag & drop editor will not work with normal HTML, so if you want to import a campaign design created in HTML, you can’t use the drag & drop editor, you will have to work with the classic option.
If we select that we want to create a campaign, we will see this screen:

We just have to fill in these fields:
- subject: The subject of our email, or message title, is what our subscribers will see when they receive our campaign in their email client.
- Preview text. It is the text of the pre-header, a small text that is displayed after the subject line in some email clients.
- sender. Here we have to select the email of the sender that we want to use. By default, we can choose the email with which we created the account.
- groups. It is at this point that we will select the group we created earlier importing the list of emails.
When we have everything ready, we will click the ” Next” button in the lower right corner.
Now, we will be directed to a screen where we can select a template:
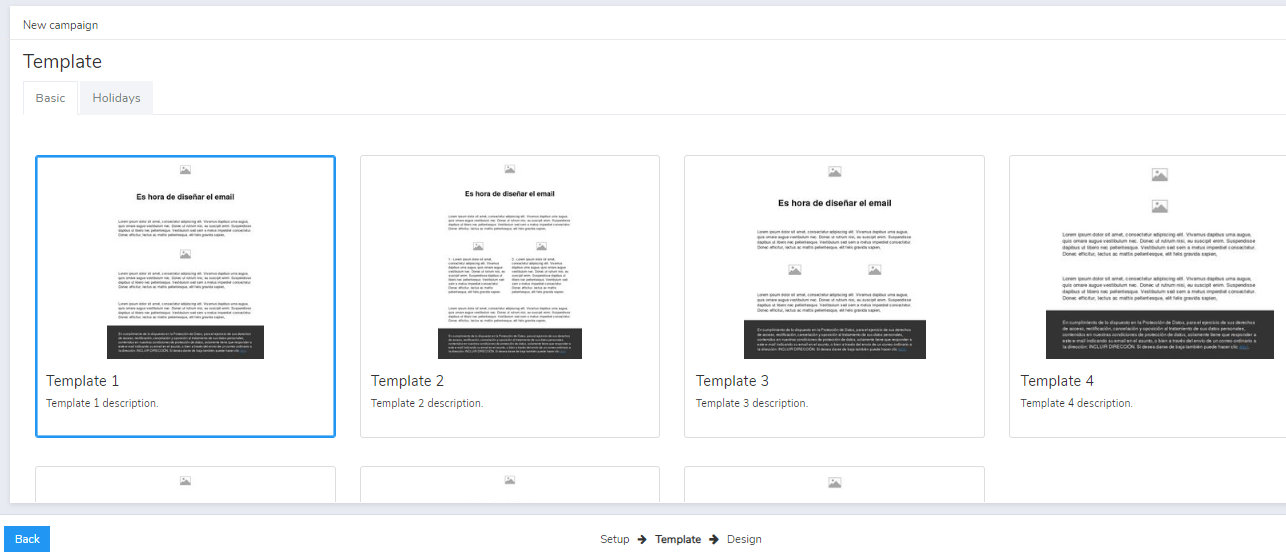
We can choose the one we want and click Next again.
Don’t worry; you don’t have to think too hard about which template you will choose because later you can change everything you want using the online editor.
At this point, just choose any template to continue.
► The drag & drop editor for creating a campaign
This editor is very simple to use. We have two well-differentiated areas, on the left, we can see the template:
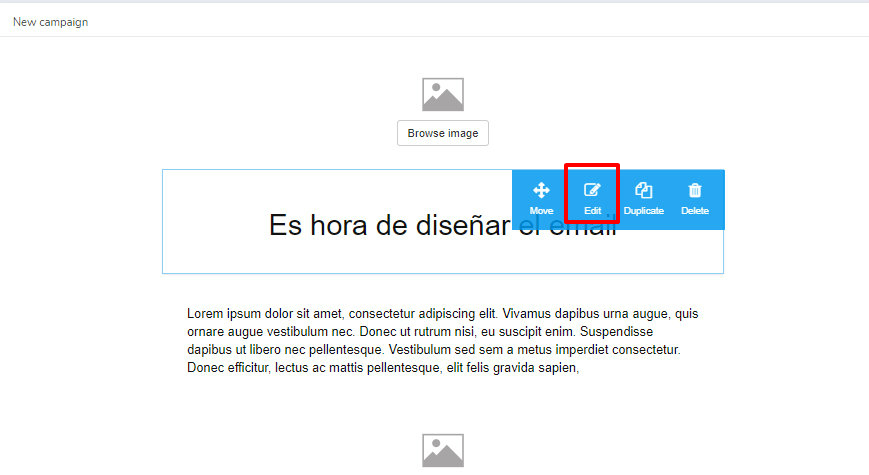
If you hover over any element, you will see a floating overlay that will allow you to:
- Move it
- Edit it
- Duplicate it
- Or delete it
In the images, you will also see the option “Search for an image,” to replace the default image with a file from your computer.
Well, that’s what we see on the left, and on the right, we’ll see this screen:
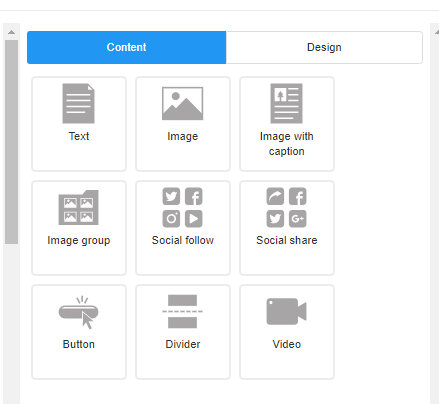
We can drag these elements to the left to edit our campaign:
We have the following options for editing a campaign:
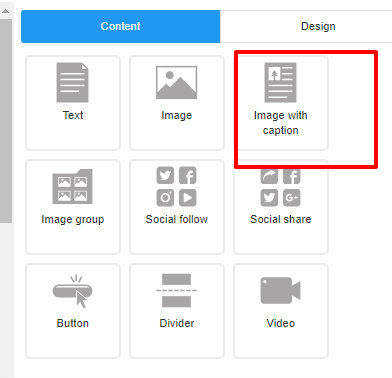
- text. To insert a text box, where you can write words, insert links and all the written information of your campaign
- image. You can use this option for inserting an image
- Image with captions. You can use this option to add an image with descriptive text.
- Group of images. To insert more than one image
- social media buttons
- divider
- and video
With these options, creating a campaign will be much easier and faster than ever.
► Inserting images
It’s very easy, if we already have an image element, just click the button For searching images. If we don’t have an image element, first we have to drag an image element to the editing area.
When you click to upload an image, you will see a screen like this one:
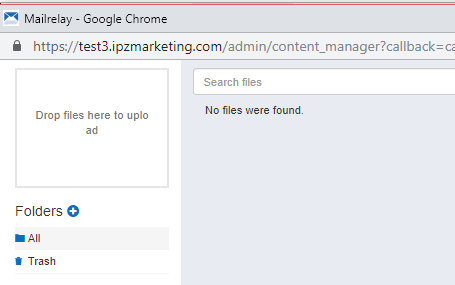
Can you see the box with the phrase “Drop files here to upload”?
Here we can click and choose an image from our computer, or drag the image, to view it immediately:
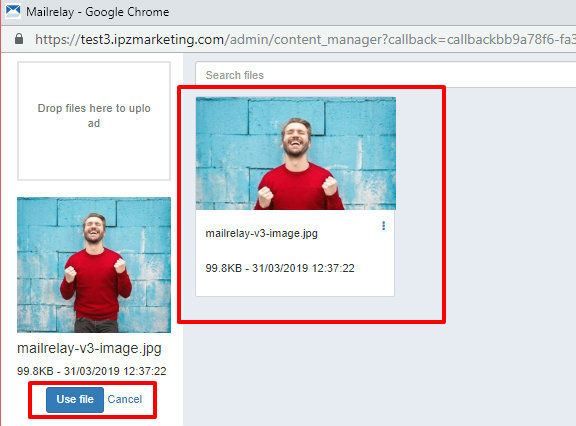
Once this is done, we just have to click on the image that we want to use on the left side and select “Use file,” to insert the image into the editor:

What happens is that maybe it’s too large. Well, no problem. We can resize the image easily.
► Resizing your image
If the image is too large, we can reduce it (we can also expand it, but it would lose definition).
To do that, simply hover over the image and click edit:
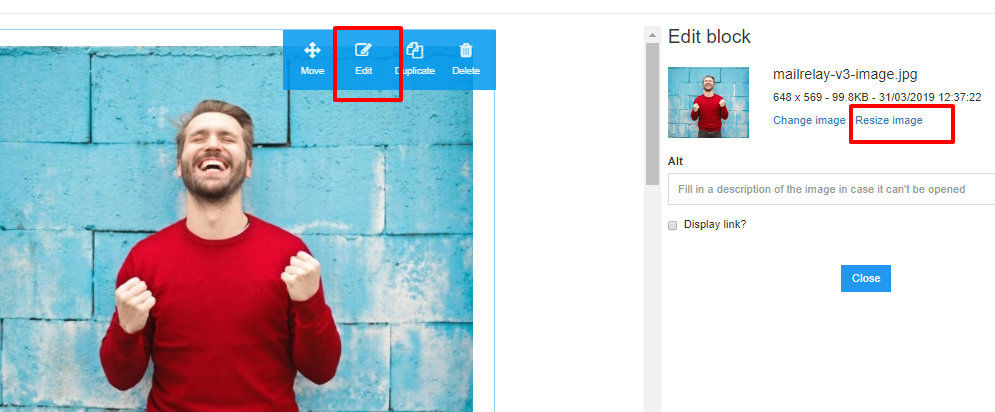
When we edit an image on the right, we can see its properties. You will see that there is a link to change the size of the image, we have to click on this link.
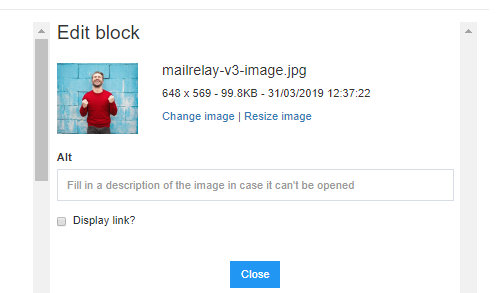
This option will allow you to enter the dimensions of the image, with fields for width and Height. Keep in mind that:
- If you want the width to height ratio to be maintained, leave the icon with a padlock marked
- After changing the dimensions correctly, click the green button to save the changes.
And the image will be adjusted to the selected size:

This option will be fundamental for editing your images. We recommend you spend some time learning how to work with all the available options, as this is a new newsletter editor with several advanced features.
Now let’s see how to use the text blocks:
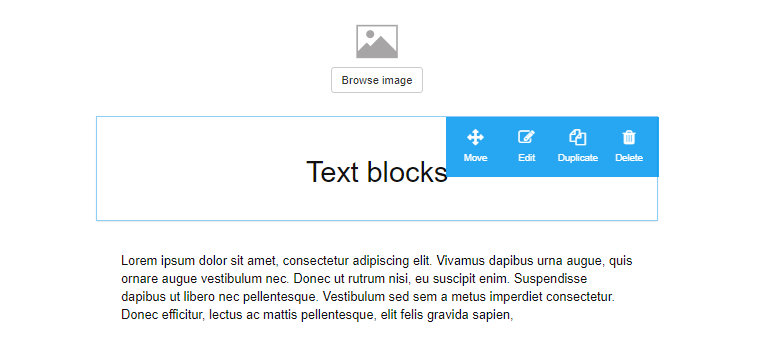
► Text blocks
Text blocks work like images, you just need to drag the block to the area in which you want to place it.
The interesting thing is the editing options we have, let’s see some of them.
Remember, after dragging the text block, just click on “Edit“:
When you click edit, a panel like this one will be displayed on the right:
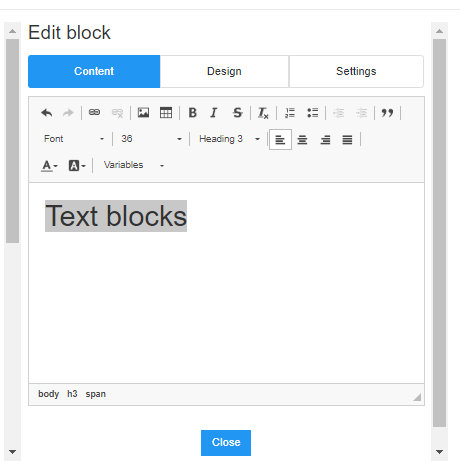
As you can see, we have three options:
- content.
- Design. Here we can select values such as font type, size, alignment, etc.
- Setting. Number of columns
For example, imagine that we want to create a text divided into two columns with the same size, we could do this:
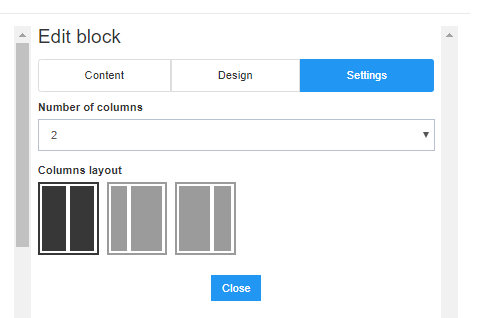
Basically what we have to do is:
Go to the “settings” tab
Then choose the number of columns “1 or 2” from the drop-down menu.
Choose the design of the columns, so that they are equal or one is wider than the other.
If we now go back to the “content” tab, we will see the following:
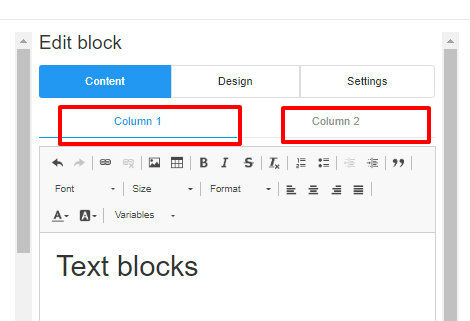
We now have two tabs in the editor, one for each column. By clicking on each one, you can edit and insert the text you want into the corresponding tab.
It’s very easy, just do a few tests and you’ll see how you can make the design completely to your liking.
For now, for example, we have this:

If we want to create justified text, we can edit the block in the “design”:
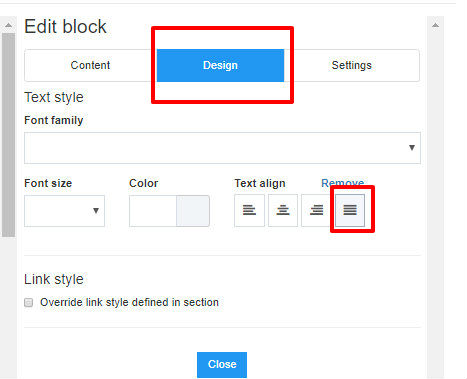
Here you can see where the option is and the different options available.
But what if we want to work with both text and image?
► Text and image blocks
This is also possible and very easy.
We can use an image block with captions:
To start, just drag this block wherever you want to position it.
Let’s choose the following options, for example:
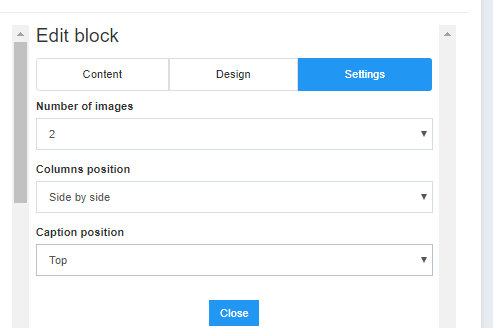
- The number of images. In this case, we will be working with two images
- The position of each column. We can add them side by side or one above the other
- Caption position. Here, we can set the position of the text, above or below the image.
When we have this configuration, the editing block will look like this:
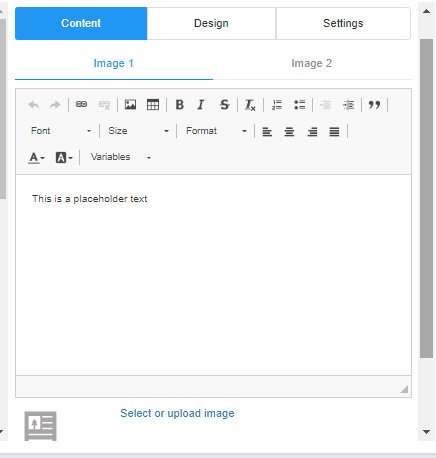
Here we can insert the text and select the image in the same way as we did before.
In the end, we’ll have a design something like this:

It’s very easy to create a campaign using our new online editor, right?
Important
If you want to use images and text in the same column, use the “image with caption” option, because with the other options you could have design problems.
For the purposes of this tutorial, let’s look at just two more aspects of editing campaigns.
► Adding the contact name
When we imported our mailing list, we included the name of our subscribers, so it would be interesting to learn how to add the name of the contacts in our emails.
It’s very easy.
Let’s edit the block of text where we want to include the name, position the mouse cursor where we want to add the name and use the “Variables.” Now, we have to look for the “Subscriber” section and choose the “Name” option.
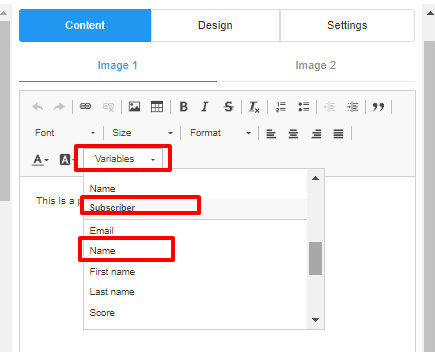
If you follow these steps correctly, the tag will be added to your text:
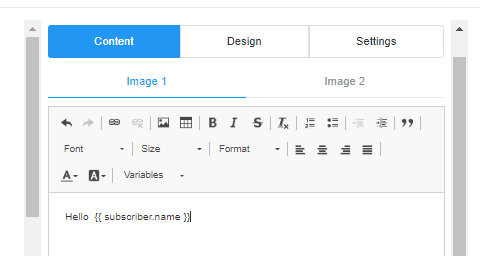
And when you send the campaign, this variable will be replaced by the name of each contact.
► Adding the unsubscribe link
As in the previous case, we will use the editor, but in this case, we have to select an unsubscribe variable:
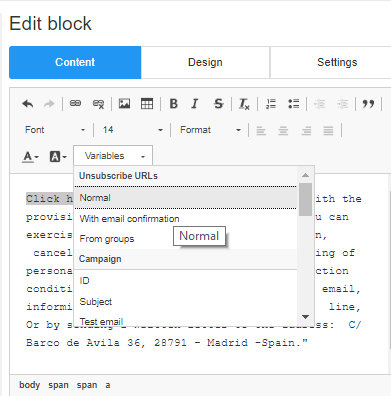
You can find several unsubscribe options:
- Normal unsubscribe URL. When the subscriber clicks, he will be removed immediately
- Unsubscribe URL with confirmation by email. After clicking on this link, the subscriber will receive an email with a link to confirm that he really would like to unsubscribe. He will only be removed after he clicks on this link.
- Unsubscribe URL for groups. It will only remove the subscriber from the group used for this campaign. If he is subscribed to other groups, he may receive campaigns sent to these groups.
If you click this option, you’ll see that the system will insert a tag on your message:
{{ unsubscribe_url }}
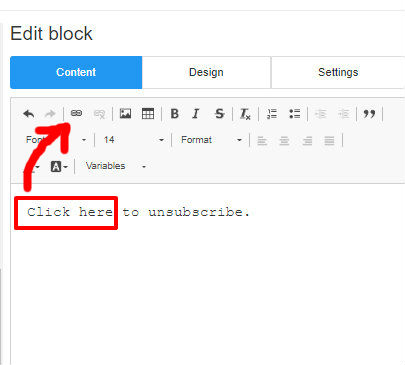
Important
Don’t add the tag manually as this would add the URL to the text and that is not what we want to do. So what we have to do is select with the mouse the text that we want to convert to a link and click on the link icon:
Our unsubscribe link is almost ready, now what we’re going to do is to configure the options displayed in the popup:
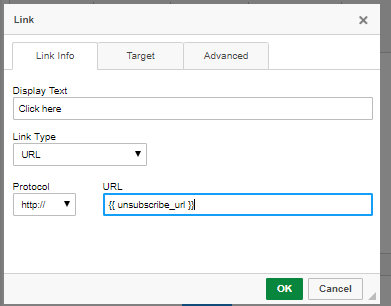
Important Values:
- Protocol. Select “Other.”
- URL. The variable code for generating the unsubscribe link.
And that’s it. Now that we have the campaign ready, we can save our work by clicking the button in the lower right corner:
Well, we’ve finished setting up the campaign template.
Don’t worry, in the next tutorials we will see more advanced options of this newsletter editor.
For this basic tutorial, we will learn how to send a campaign.

· How to send a campaign with Mailrelay
This is the last part of the tutorial. We will learn how to send the campaign we created.
This part will be very simple, you will see. First, let’s go back to Campaigns -> campaigns. Here we will see a list of all the campaigns we already created:
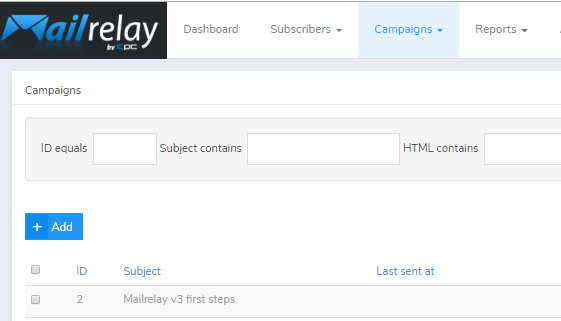
This is the screen that interests us, on the right:
You will see, for each line, a series of icons like these:

Let’s see them, from left to right:
- Send
- Duplicate
- View
- Edit
- Delete
In this case, we will use the first icon/button. When we click on it; we will see a screen like this one:
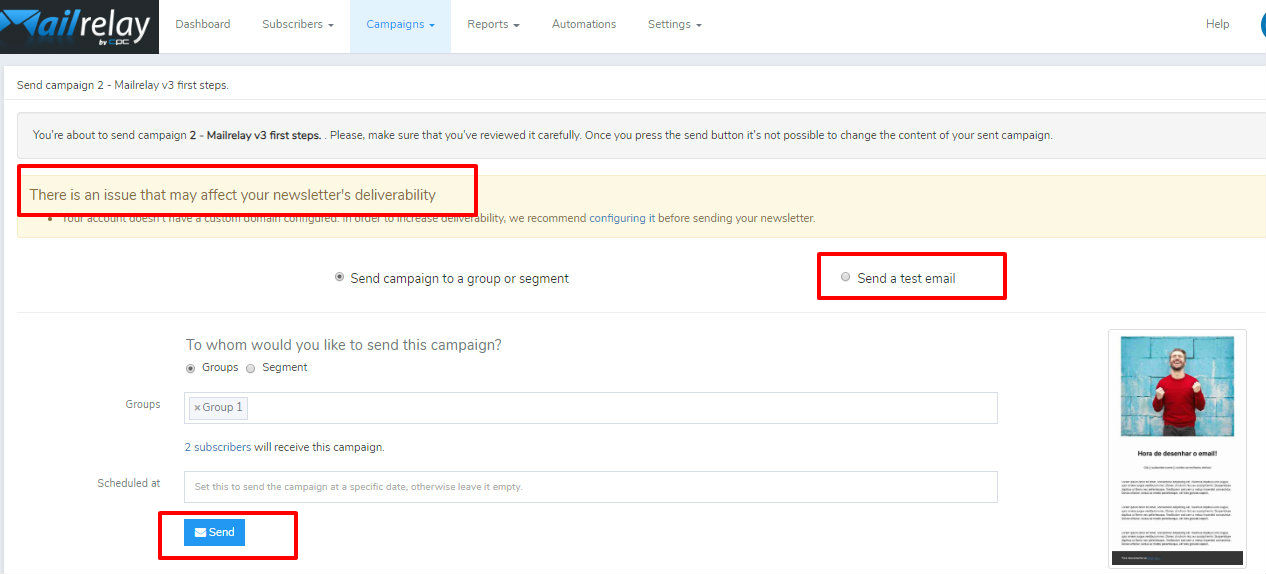
Let’s review some important aspects of this screen.
The system will display some error messages and tips to help us improve our delivery rates.
To improve our sender score reputation, we should set up our DNS, adding these three records:
- SPF
- DKIM
- Custom domain
If you click on the links, you will see more information about how to add these settings.
A little further down, we have two more options:
- Send a campaign to a group or segment. We can use this option to send the campaign to the group with our mailing list.
- Send a test campaign. We can use this option if we want to send a test email, to see how the campaign will be displayed in our email client.
We are almost done, but we can still:
- Schedule our campaign
- Send a campaign immediately
Well, we’ve already sent our message.
The last point of this tutorial is:

· How to analyze statistics
When we want to see the results and statistics of our campaign, what we have to do is go to the Reports menu -> Sent campaigns.
Here we can see a list of sent campaigns:
Note that the status indicates “completed,” otherwise it would indicate that the system is importing the file or any possible error.
In this screen, we can see a small summary of the emails sent, openers and clicks. Anyway, if we want to see the details of the campaign, we can click on the subject of the campaign, and we will see a screen with more details:
You can see information about:
- Number and percentage of delivered emails
- Bounced Emails
- Open rates and unique views (it is possible that the same subscriber will open the email several times)
- Clicks and percentage
This is a quick, general summary.
But note that we have more menus next to the arrow:
- emails sent
- views
- clicks
- Unsubscribed users
- forwarded
In these menus we have much more information, such as the contacts who opened, those who clicked, the click map.
The truth is that this is enough for a whole post, and that’s what we’re going to do so as not to make this one too long.
I think that for a first contact, we’ve seen the most important aspects of what you can do with your new Mailrelay account.
We hope this tutorial helps you with your first steps into the world of email marketing!
Remember that Mailrelay offers you the only free account:
No daily sending limit, no advertising in your newsletters, no limited features – the only really free account!
Most tools limit the accounts they offer for free, limiting the number of emails that can be sent per day, as well as the features included.
And almost all of them include advertising.
By including advertising, they take advantage of your marketing efforts to gain visibility. Are these accounts really free?
Even some of the alternatives to bulk email marketing platforms include advertising in basic paid accounts.
Paying to include advertising from another company?
I don’t think that’s a good idea.
Mailrelay’s free account includes no advertising, no daily limits and is not limited in any way.